
How to render in Blender
Rendering is at the heart of what we do in Blender. When you are starting out it is good to understand how it works so that you can actually get some output to show and use.
To render in Blender Press F12 for rendering a still image or Ctrl+F12 to render animation. You can also go to the render menu and choose render image or render animation from there.
Of course, there is more to the story. In this article we explore the basics of rendering and what goes into it. I will also direct you to additional resources that are good to follow up with as you learn more about rendering.

What is rendering in Blender?
Rendering is when the computer calculates the light in our scene to create the final image or animation. To calculate the lighting the render engine needs information from our scene. This includes things like:
- Geometry
- Materials
- Light setup
- Textures
- World background
There is more to it, but these are the basic building blocks used by the renderer in our scene.
By the way, if you enjoy this article, I suggest that you look at my E-Book. It has helped many people learn Blender faster and deepen their knowledge in this fantastic software.
Suggested content: Artisticrender's E-Book
Let's continue.
Blender has two render engines built in. Eevee and Cycles. These two render engines aim to be similar in look but work completely different.
Eevee is a rasterized render engine, meaning that its primary goal is to be fast. This kind of render engine is suitable for real-time or close to real-time performance.
Cycles on the other hand is a ray-traced render engine. This is a much slower kind of render engine. The benefit is that it is much more accurate and produce an image based on how light bounce in the real world.
It is possible to produce a good-looking image with both engines, but they take vastly separate ways to the resulting image.
How to render an image in Blender
Pressing F12 is the quickest way to start a render in Blender. The render engine we use can be set in the render settings tab found in the properties panel.
Go to the camera icon in the properties panel, find the render engine drop-down and select Cycles or Eevee.
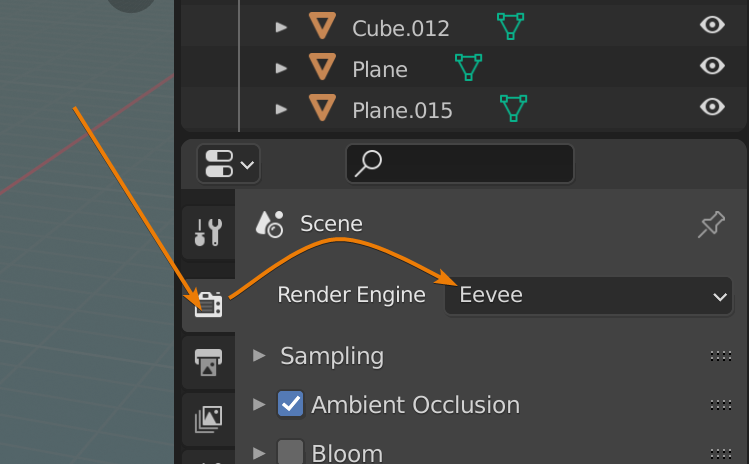
You will also find the workbench render engine here, but we don't need it. It is essentially the same as solid shading in the viewport.
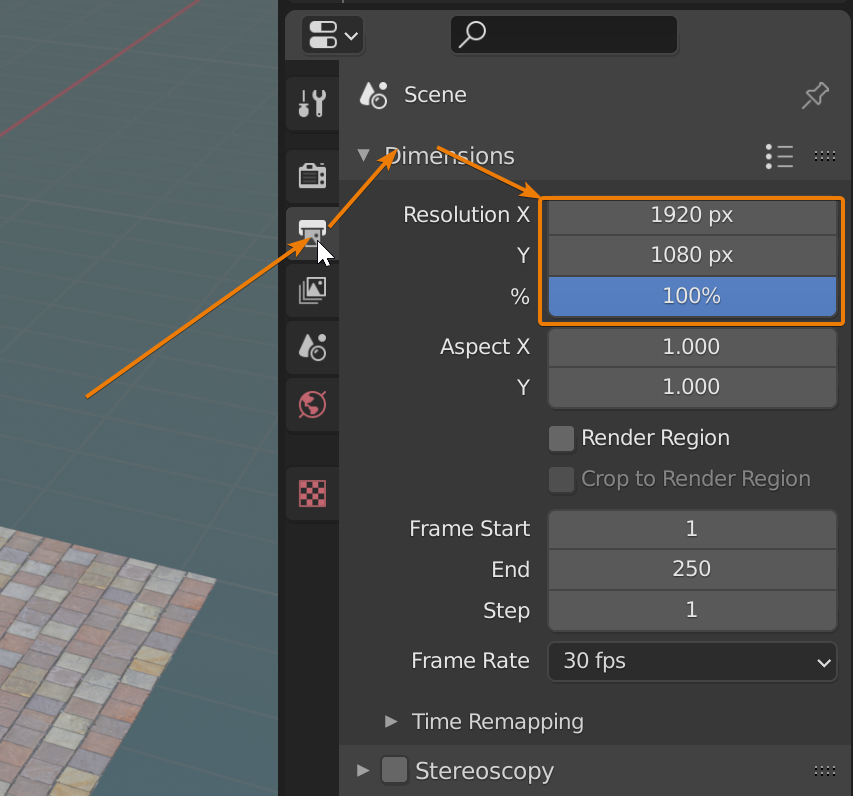
Next, we should also check the output properties tab just below the render settings tab. Here we find the dimensions section where we can set the resolution of our render.
For a complete guide on Cycles and Eevee render settings, you can check out these guides.
When the render starts an image editor will pop up showing us the render progress. Once completed, we can save the rendered image by pressing Alt+S or by going to the image menu where we find "Save" or "Save As".
By default, the PNG file format is selected, but if we want to save an image that is equivalent to a photographer's raw files, use OpenEXR. This file format supports high dynamic range and can support multiple layers.
If you are struggling with long render times you might need to configure Blender to use your GPU for rendering. Read how to do that here:
Related content: How to use the GPU to render with Blender
In some cases, this is not enough, even if you have a decent GPU to use. In that case you can check out K-Cycles, an unofficial build of Blender that optimize rendering and can give you a significant performance boost. Just keep in mind that it requires an Nvidia GPU.
External content: Blendermarket - K-Cycles


0 comments